Step by Step Guide: How to Create Stunning Rotoscope Animations in Photoshop
Welcome to 3D Services India’s ultimate guide on creating captivating rotoscoping with photoshop! If you’re looking to master the art of transforming video clips into mesmerizing animated silhouettes with realistic movements, you’re in the right place. Our step-by-step tutorial will walk you through the entire process, ensuring you can achieve outstanding results, whether you’re a novice or an experienced graphic artist.
Step 1: Setting Up Your Workspace
The first step in creating a stunning rotoscope animation is to set up your workspace correctly. Here’s how you do it:
1. Create a New Video Timeline: To begin, launch Photoshop and go to the “Window” menu. Select “Timeline” and then click on “Create Video Timeline.” This is your canvas for the animation.
2. Optimal Frame Rate: Choosing the right frame rate is crucial for smooth animations. In the “Timeline flyout menu,” select “Set Timeline Frame Rate” and specify your desired value. Typically, 20-25 frames per second work well, but you can go lower for more complex animations.
3. Import Your Video: To work on your animation, import your video clip or movie by selecting “File” and then “Place Embedded.” You can choose a specific section of the video or import the entire file.
Step 2: Frame Extraction
Now that your workspace is set up, let’s extract the frames you’ll be working with:
4. Choose the Frame Count: Decide how many frames you want to include in your animation. For short animations lasting 3-8 seconds, 10 frames are often sufficient. Ensure you check the “Create Frame Animation” box.
5. Create a Background Layer: Before sketching your animation, create a new layer outside all folders for the background. You can use a solid color or a texture depending on your animation’s needs. Under the “Layer” menu, select “Layer” and then “Video Layers” followed by “New Blank Video Layer.”
Step 3: Sketching Your Rotoscope Animation
With the frames ready, it’s time to start sketching your rotoscope animation:
6. Begin Sketching: Navigate to the first frame in the animation panel, create a new layer within the drawing folder, and set your foreground color to black. Use a small, hard brush and draw the outlines for each frame. Move between frames using the timeline or arrow keys and continue sketching until all frames are complete.
Step 4: Adding Color
In addition, If you want to add an extra layer of vibrancy to your rotoscope animation, consider adding color:
7. Create a Video Layer for Color Fill: Go back to each frame and apply color to the outline using either built-in or third-party watercolor brushes in Photoshop. This step is optional but can enhance the visual appeal of your animation.
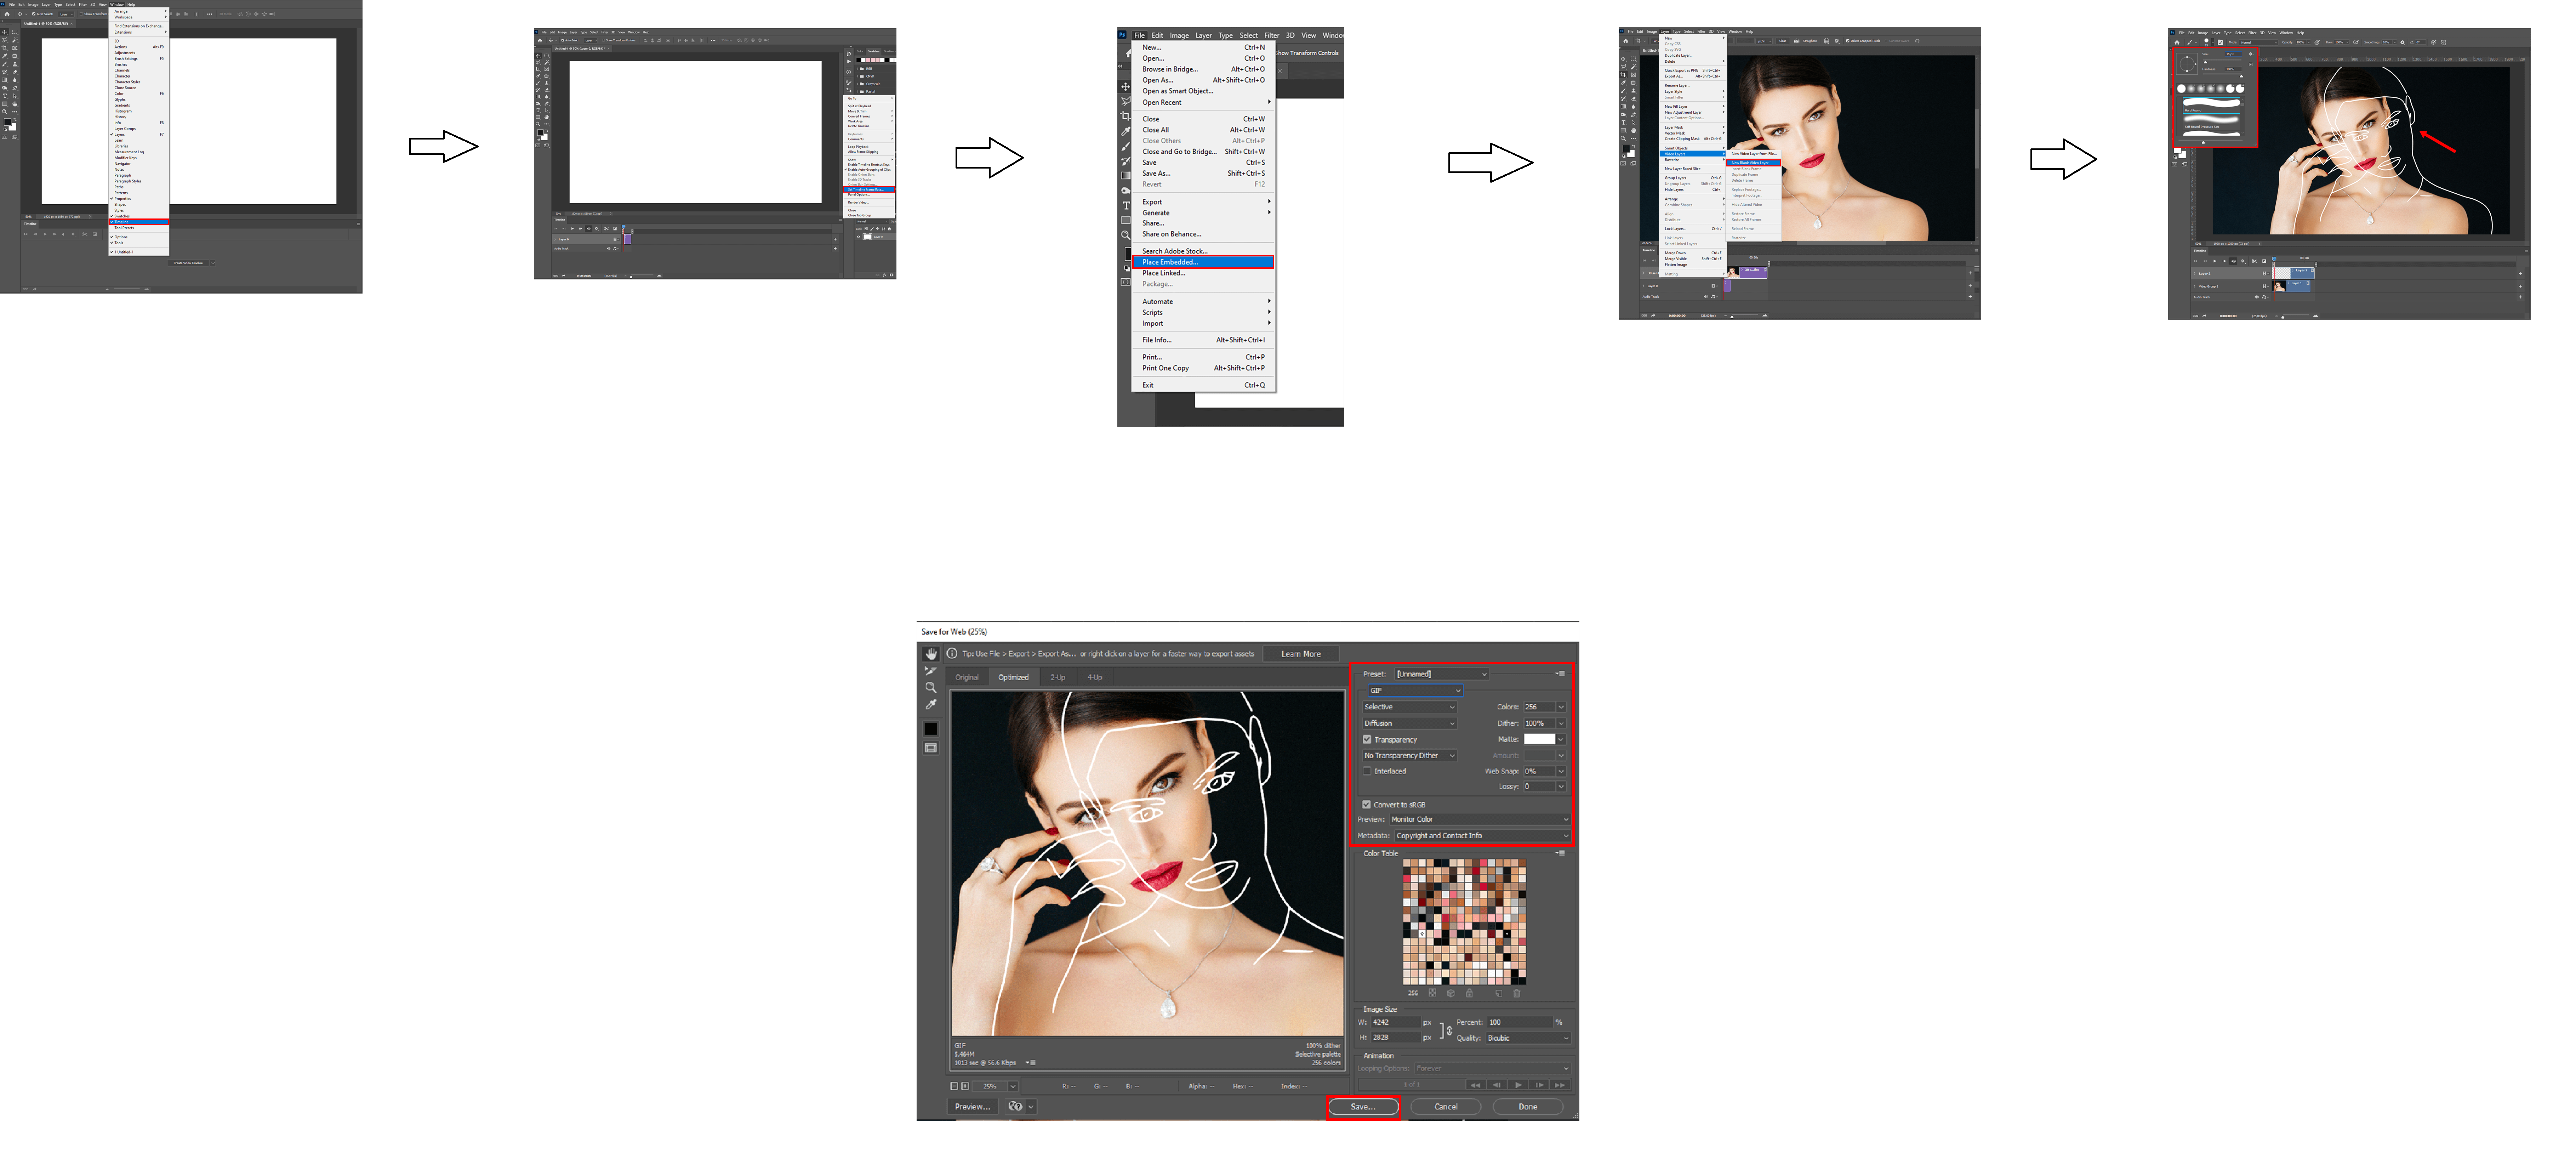
Step 5: Export Your Masterpiece
With your animation complete, it’s time to save and export it as a GIF:
8. Export Your Rotoscoping with Photoshop: Close the folder with your video frames and navigate to “File” → “Export” → “Render Video.” Choose “Forever” under looping options and hit “Save.” Your stunning rotoscope animation is now ready to be shared with the world!
Bonus Tip: Speed Up Your Workflow
For larger-scale projects or to streamline your workflow, consider using third-party plugins and actions:
– Download Free Photoshop Plugins: These invaluable tools can automate various processes, including contour filling, layer creation, and exporting, helping you complete tasks more efficiently.
– Create Custom Actions: Learn how to create your own automation settings in Photoshop, tailored to your specific needs. This can further expedite your rotoscope animation projects.
In conclusion, mastering the art of rotoscoping with photoshop can open up a world of creative possibilities. Whether you’re looking to create captivating animations for entertainment, educational purposes, or business promotions, following our comprehensive guide will help you achieve outstanding results. So, get started on your next animation masterpiece with 3D Services India today!